Alrighty friends, I’m back. And as you’ve guessed from my oh-so-clever post titles, this is about Microsoft Teams SIP Gateway and Cisco Handset (plastic phone) devices. This is an apparently never-ending series of posts around devices and features in the SIP Gateway. I anticipate more to come so I’ve chosen not to even attempt to number them all.
Quick Review
Let’s review a couple really key pieces I’ve referenced in several posts in the past
- Plan for SIP Gateway
- Configure SIP Gateway
- Both of those links above give you the technical nuts and bolts needed to provision a supported phone to utilize Teams Phone via the SIP Gateway.
- I’m also going to assume you’ve taken the time to read my past useful posts and know that I’m not going to provide every single screen shot and click you need. I’ve done the work to create a properly licensed and Voice Enabled identity (AlexW@mydemo365.com – the domain I use for this lab)
Environment Prep
In this case, I have a Cisco 8845 Video Phone that my friend Miguel was kind enough to send me.
And you’ll notice this phone already has the MPP firmware needed – and cross referencing that handy “Plan for SIP Gateway” URL above, I’m good to go!

Device Configuration
We’ll get started in the usual way – reviewing the “Configure SIP Gateway” URL above, I know I need to configure this phone to look to the appropriate Teams SIP Gateway URL. I could do this with DHCP Options if I had that in my lab (I don’t anymore) so instead, I’ll set this up with a manual WEBUI configuration. I’ll start by navigating to http://IP_OF_PHONE/admin/advanced

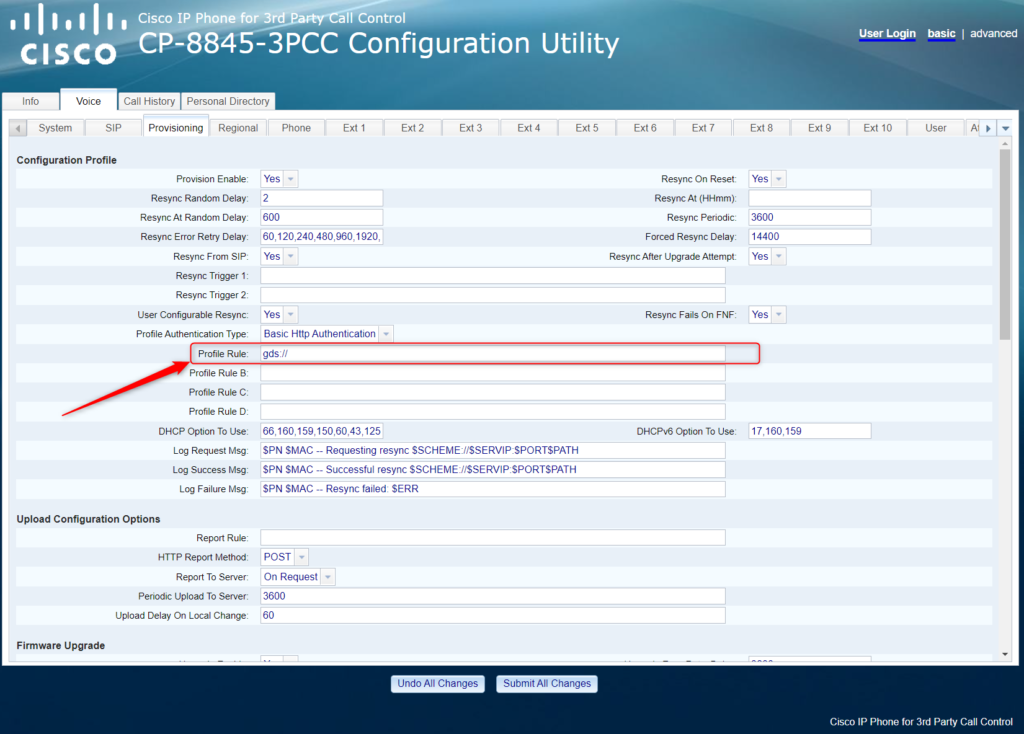
Now I’ll navigate to the Voice -> Provisioning tab and I’m going to want to change the “Profile Rule” URL

As you review the “Configure” URL, you’ll want to change that to the Teams SIP Gateway provisioning URL that’s relevant for your region. For me, I’m in the US, so I’ll use the “noam” URL and ensure that the /$PSN.xml is appended properly to the URL as below

Now, after I Submit my changes, the WEBUI shows me this

… and about 30 seconds later my phone reboots and I’m at the Teams SIP Gateway pre-login UI

Device Login
From this point on, this should be super familiar to the other SIP Gateway posts I’ve written and any other “device pairing” you may have done with a Teams Device. By clicking the Sign In button, the phone will request and present the device pairing code

and the last piece of the puzzle is to navigate to that URL and use that Code to properly authenticate my identity (AlexW@mydemo365.com) and login this device. Here are a few unannotated screen shots.


And about 30 seconds later, my phone refreshes and logs in as Alex! This is reflected on the Phone UI by the DID (Phone Number) that I assigned.

And, just to close the loop and connect all the dots, I navigate to TAC (Teams Admin Center) and head over to Teams devices > SIP devices to make sure it properly appears. And it does.

Fini
That’s all for today. Hopefully short(er) and sweet(ish) showing the simple provisioning of a Cisco Device into Microsoft Teams via the SIP Gateway. Anything you would add? I’d love to update with any details that you think are important! Cheers friends!
1 thought on “My Demo 365: SIP Gateway + Cisco Handset”
Comments are closed.