Hi there! Me again! This is part 2 of a series on Teams Phone Direct Routing. In Part 1 of this series we successfully deployed an AudioCodes SBC (Virtual Edition) from the Azure Marketplace. We then created an appropriate Teams TLS/Security context, generated a public certificate, and applied that to the SBC. Additionally, we configured the WebUI/UX to use that same certificate for secure administration to the SBC.
As a reminder, to get started with Direct Routing you need a number of things. You can read the full details in the “Plan for Direct Routing” document, but, I’ll add just a few bullet points below to guide us in this article series:
- NOTE – we covered these in Part 1
- Microsoft 365 Environment, Users homed online (not on-premises)
- Any Teams license that also is bundled with or supports Teams Phone as an add-on license (this includes users, Shared Devices (Common Area Phones), and also Teams Rooms licenses
- A public domain properly connected to your M365 Environment. This needs to be in the form of domain.com and you cannot use any tenant that is part of the *.onmicrosoft.com domain structure.
- A properly deployed physical or virtual Session Border Controller
- Properly configured SSL certificates for secure communication with the SBC
- We will pick up here today in Part 2
- A properly configured Session Border Controller for both Teams & PSTN Telco
- Properly configured Teams environment to connect to the SBC
- Properly configured Teams identities (users / devices) with licensing and Teams Phone enablement
SBC Configuration for Teams & PSTN Telco
Let’s pick up today with SBC Configuration. The way I’m going to setup my Direct Routing environment is with the AudioCodes SBC created last time, Teams, and then I’ll be using voip.ms as my telco provider. Let’s get started by logging into the SBC – and if you remember from last time, we can do this via https://FQDN – or in my case – https://sbc01.mydemo365.com
Login and then let’s get started with configuration. For my setup today, since I’m working with Teams and voip.ms, I’m going to share two key things with you:
- voip.ms offers a robust wiki and a direct link to a “how to” guide to configure voip.ms, Microsoft Teams, and the AudioCodes SBC. Cheat code unlocked! AudioCodes – VoIP.ms Wiki
- And you can get started by running a “Configuration Wizard” on the AudioCodes SBC to do the majority of the heavy lifting! Yeah!
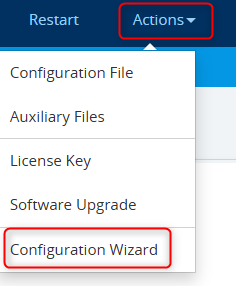
It’s your choice. I recommend – highly – that you read through the WIKI above. This gives you the most information so you understand what you’re doing. I feel pretty comfortable already with AudioCodes SBC configuration, so, rather than attempt to run through the very long / very manual process of configuring the SBC for voip.ms and Teams, instead, I ran the Configuration Wizard to start. It looked like this. On the SBC, in the top-right corner, I chose Actions -> Configuration Wizard
The Wizard launched and offered some expectations including the key box of info I highlighted here
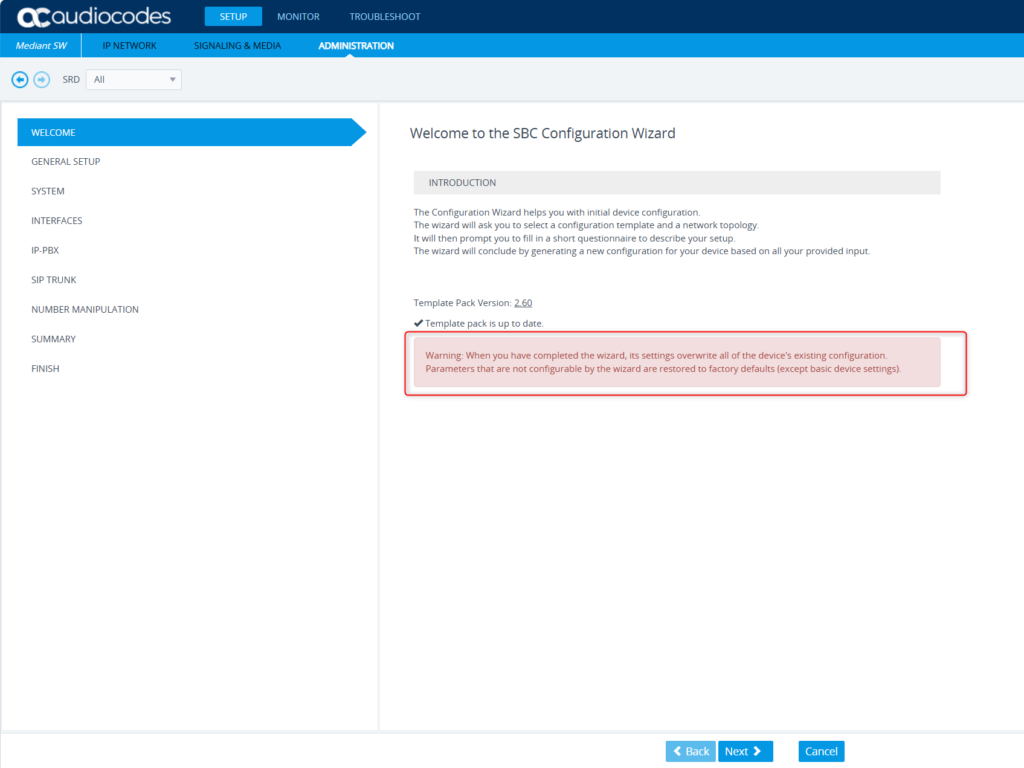
So, if you’re going to use the Wizard, it may be better to do that before you setup certificates, etc. While those certificates were not deleted, I did have to go back to setup the device specifically for the web interface. You’ve been warned. Click next.
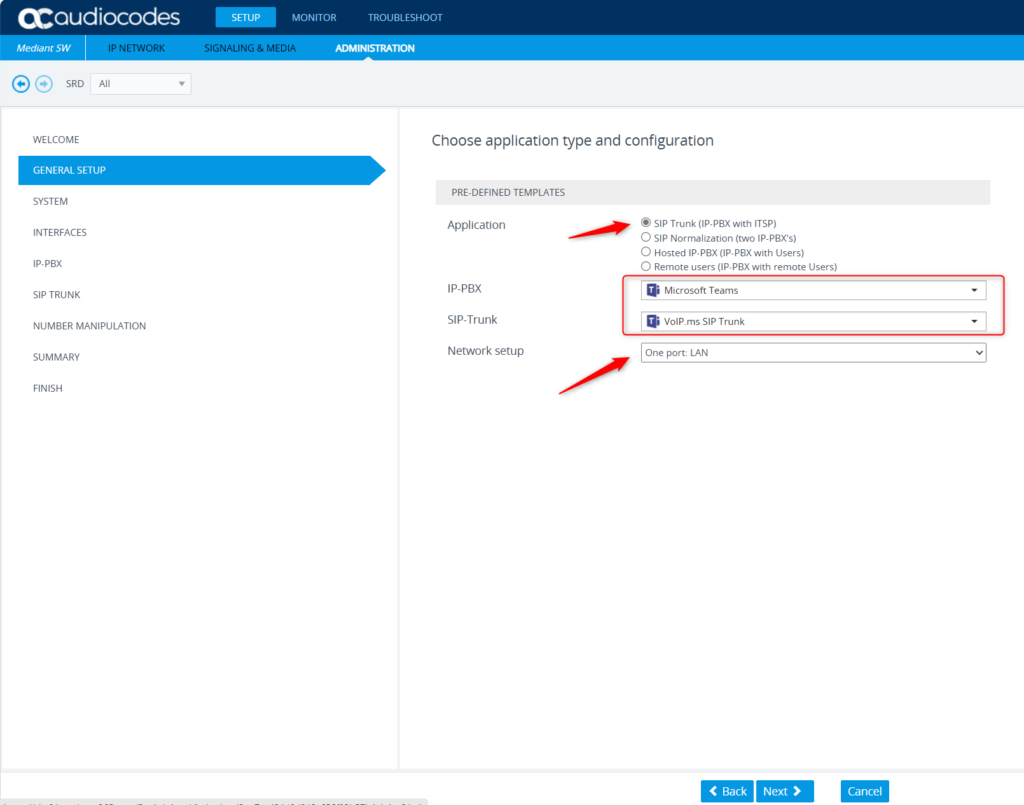
I chose the basic setting of one network port (just as was configured during Azure Marketplace deployment). YMMV. So, choose which you prefer. And also for me, since I was already using Teams (duh!) and voip.ms as my telco provider, the basic settings for both are included in this Wizard. Click Next.
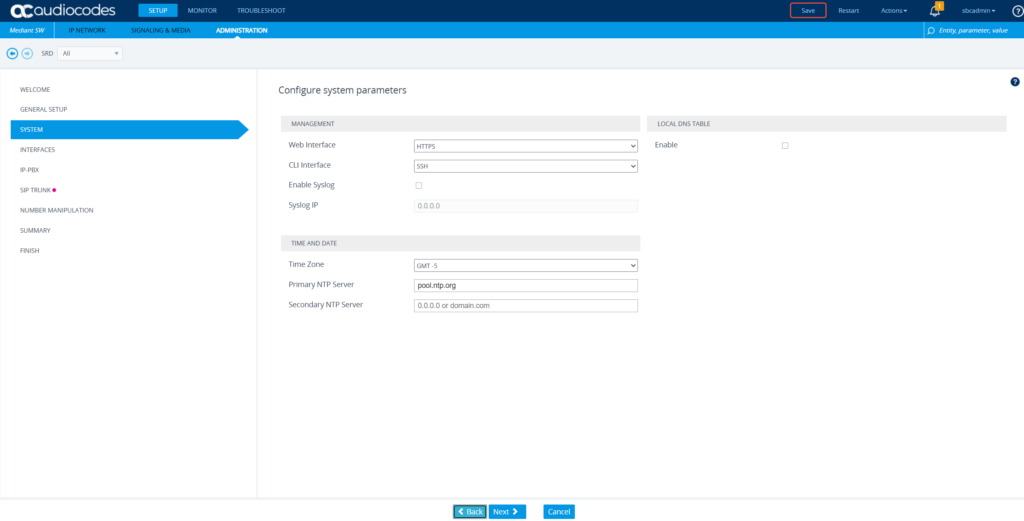
Adjust anything as needed. For me, I adjusted the Web interface to be HTTPS only, CLI to SSH (although I’ll probably disable that via the firewall until I need it), and set the Timezone / NTP Details. Click Next.
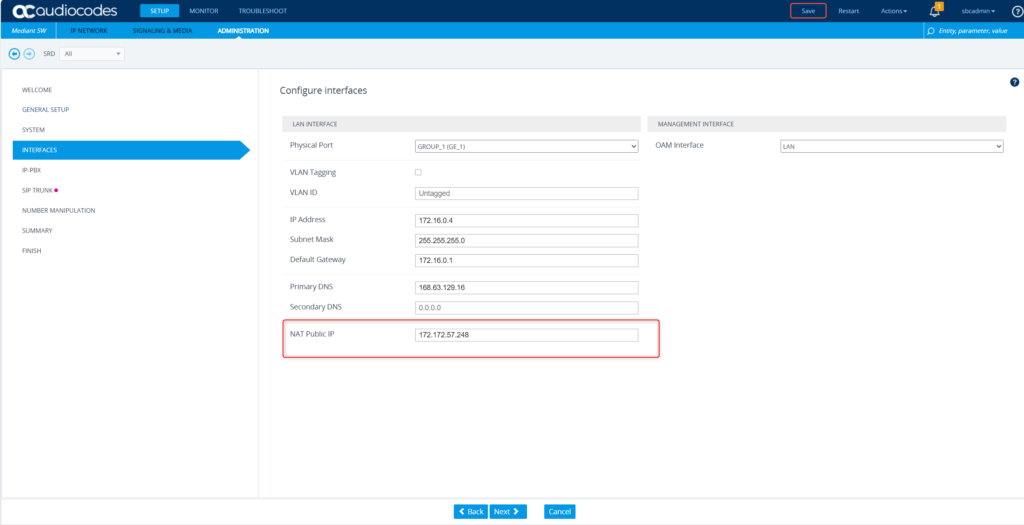
This pulled through the basic networking details. I made sure I entered the proper NAT Public IP from the Azure Marketplace deployment of the SBC. I discussed this IP in Part 1 of this series. Click Next.
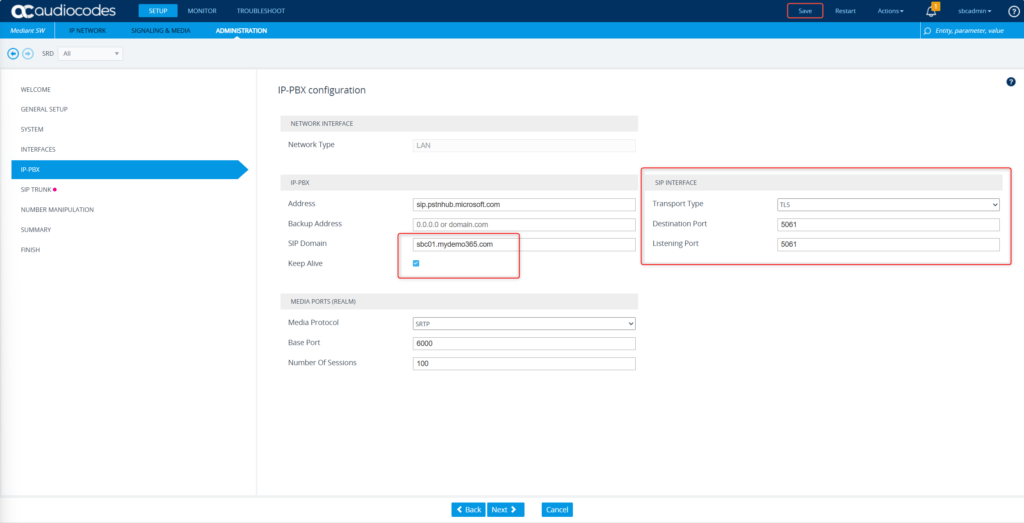
I let the Wizard choose the basic settings needed. Note that I included the SIP Domain / FQDN for my SBC – sbc01.mydemo365.com – and also note TLS Port 5061. You’ll need that later. Click Next.
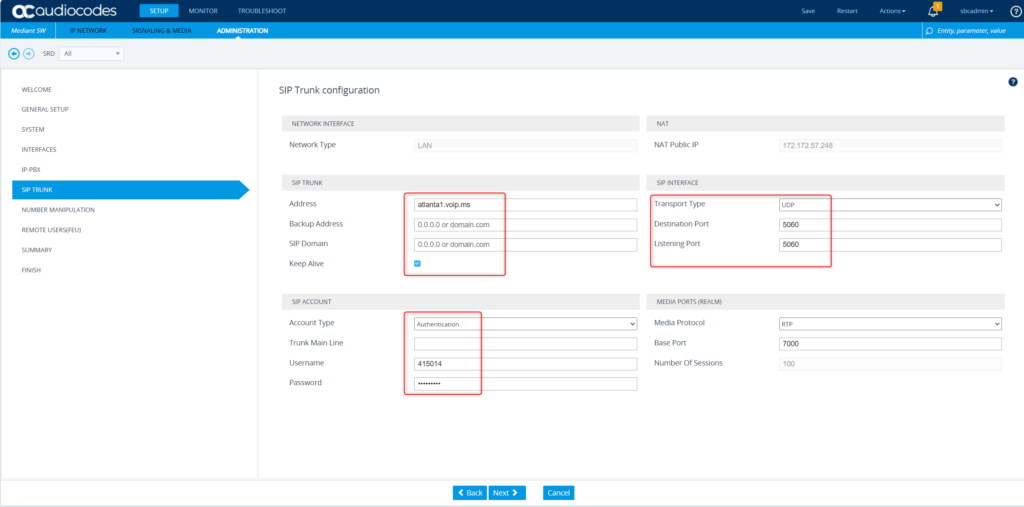
This one will be unique to your specific telco provider. In my case, I use voip.ms and I know that I have mine setup to use the specific “atlanta1” POP, I am doing user-based authentication for the trunk, and I am using UDP port 5060. Your mileage may vary. But this is mine. Click Next.
These are the standard / default settings. Click Next.
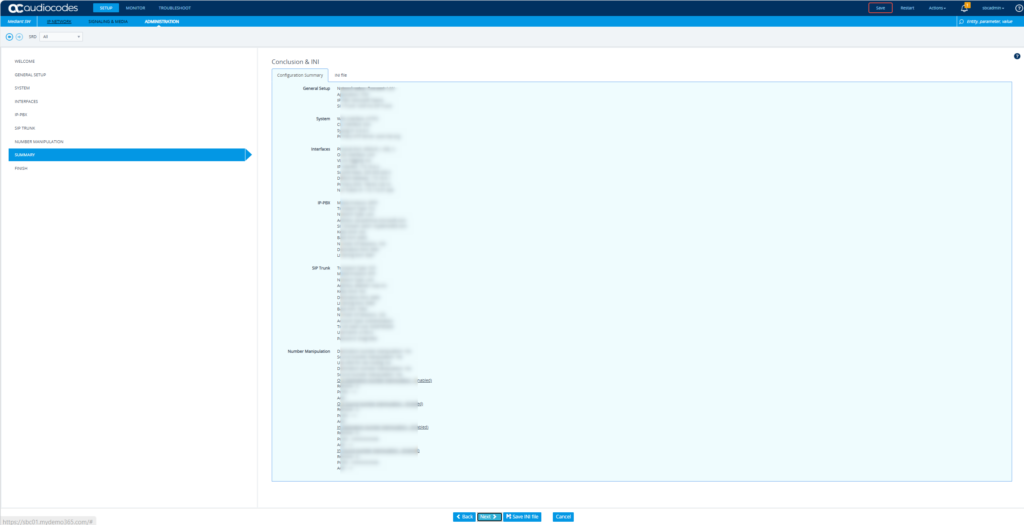
Verify your summary, maybe even download the configuration .INI file. Click Next.
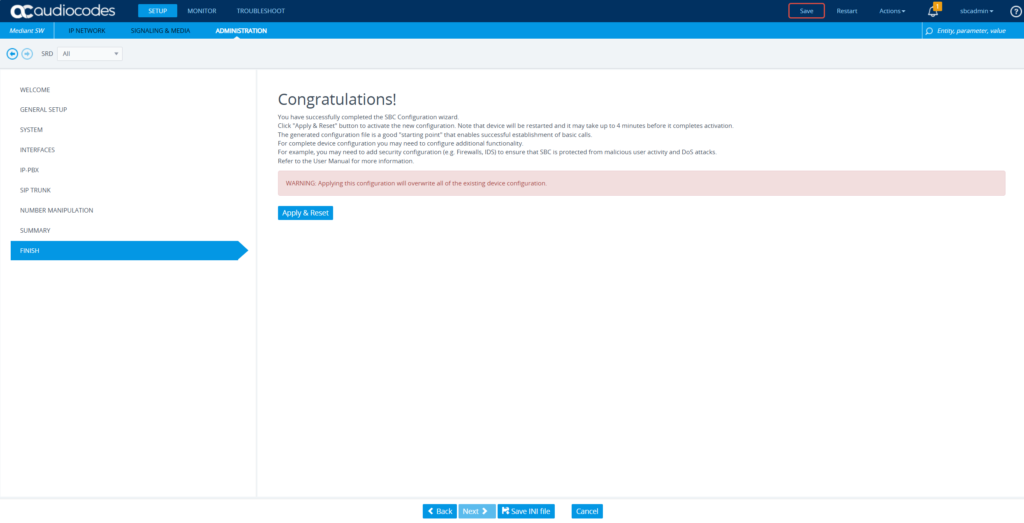
Last chance to backout! If you need to, just reboot and not save, and you’re back where you started before you launched the Wizard. But, if you’re happy, click Apply & Reset. That’s exactly what will happen. It will apply the settings and reboot.
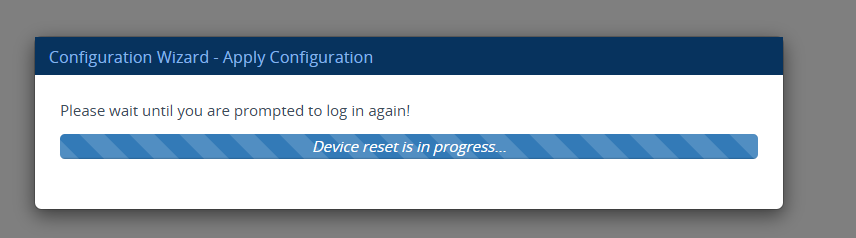
Back Online! Let’s Login.
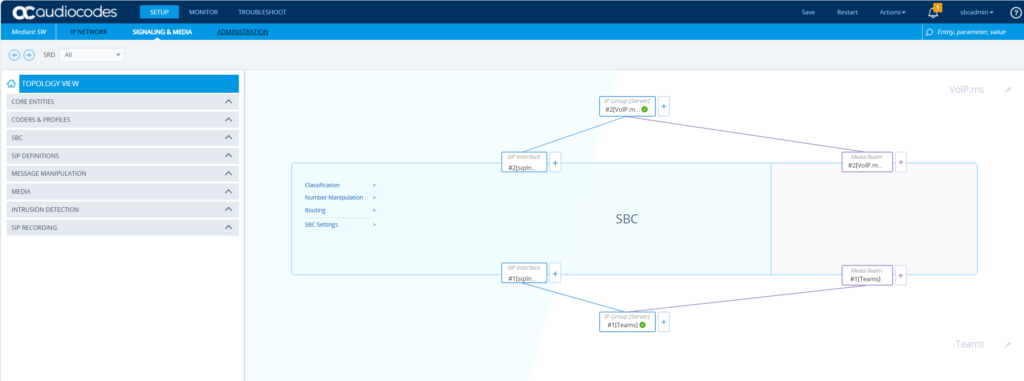
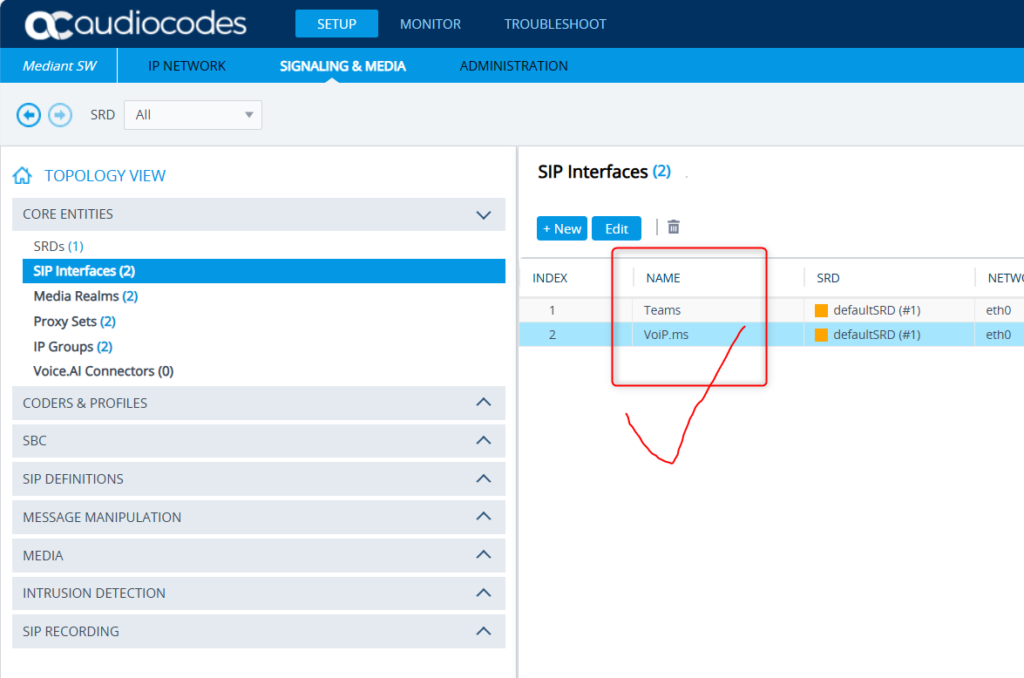
Great! Initial configuration looks good. But, this might be a good time just to double check / validate the Wizard settings meet your needs. Remember, I shared the WIKI and the “long version” of the article just above. I advise you spend a little time tweaking what you need to once running the Wizard. In my case, I want to specifically adjust a few things. First of all, SIP Interfaces. Navigate to Setup -> Signaling & Media -> Core Entities -> SIP Interfaces
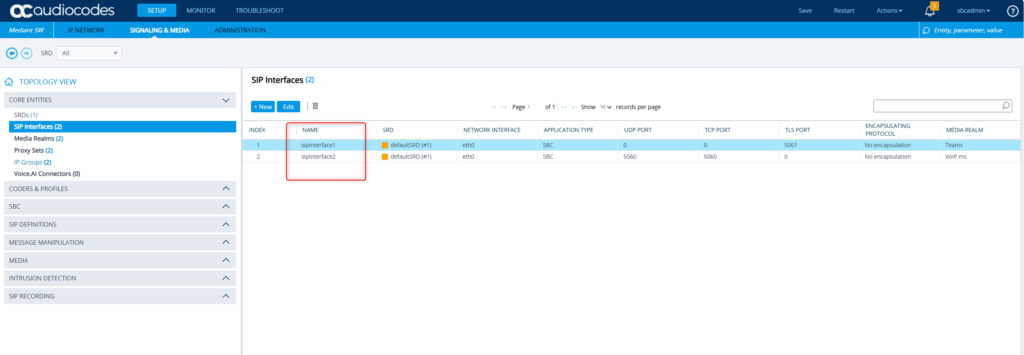
I don’t like these names. I want to name them something more useful. Let’s EDIT the interface names to something more useful like “Teams” and “VoiP.ms” okay? Save and Apply.
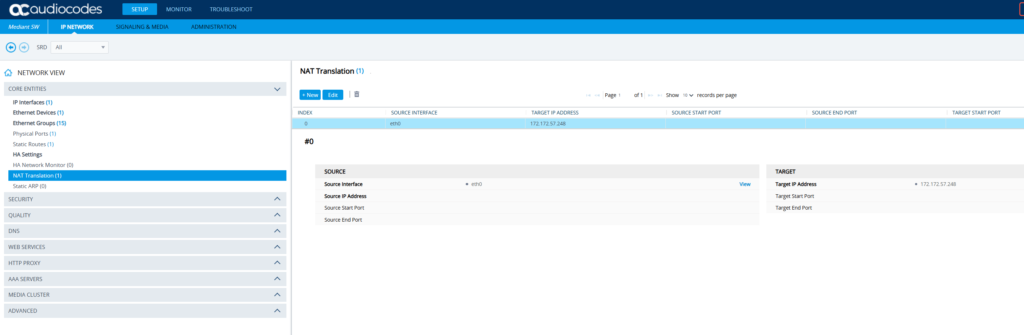
Much better. I also want to check NAT. I remember the Configuration Wizard used to create separate port-based NAT policies. That’s not what I want. I just want a single IP Based policy. Navigate to on the SBC to Setup -> IP Network -> Core Entities -> NAT Translation
I forgot the before picture, but, this is what I personally want. Nothing port-based, just IP based. YMMV.
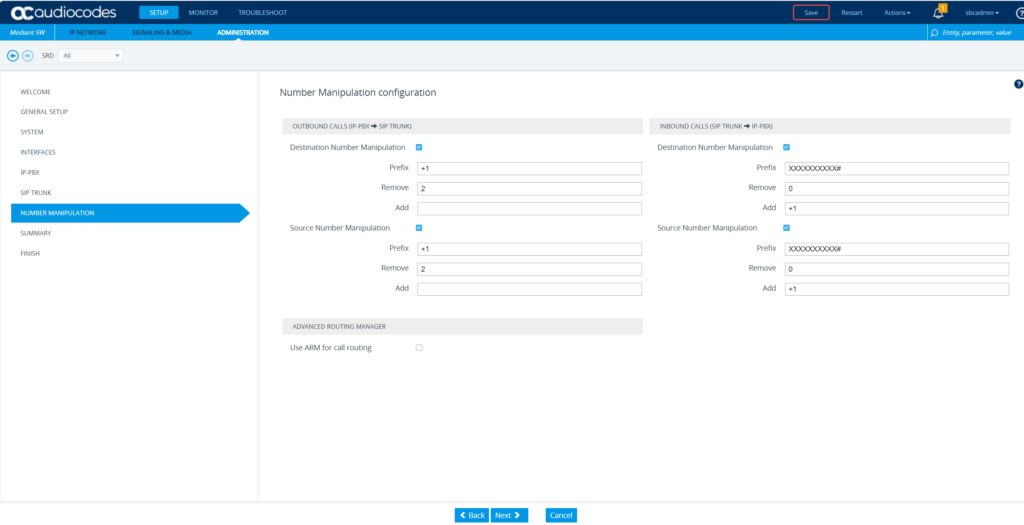
Finally, let’s also verify the voip.ms account is configured right on the SBC. Navigate to Setup -> Signaling & Media -> SIP Definitions -> Accounts
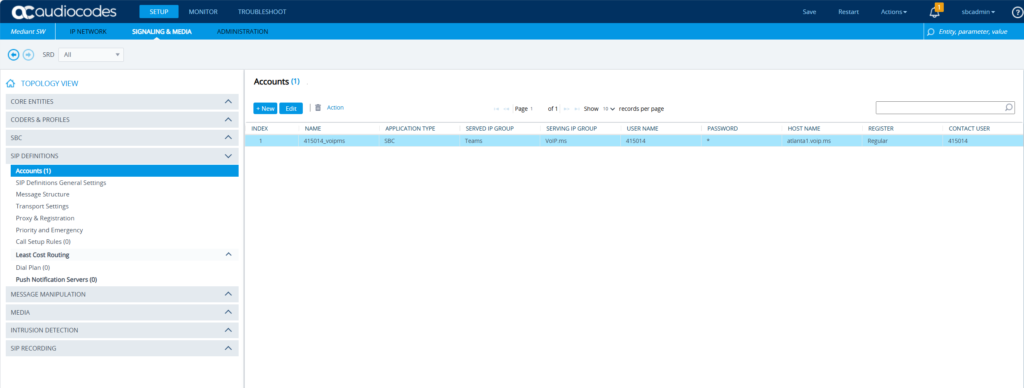
Click Edit and look at the details.
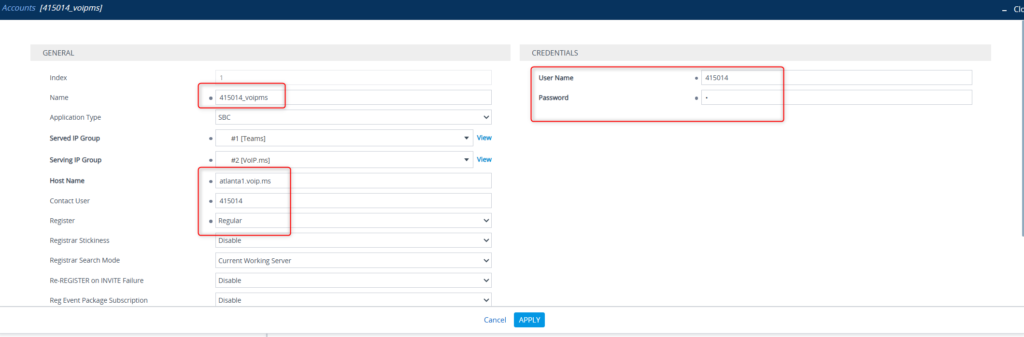
What I really want to make sure is that the account has a useful name, is set to properly register and authenticate to the voip.ms “atlanta1” POP, and that the username/password is correct based on my voip.ms account. I validate that and click Apply. Then I Save & Apply. Let’s make sure that account is working right. Head over to https://voip.ms and login.

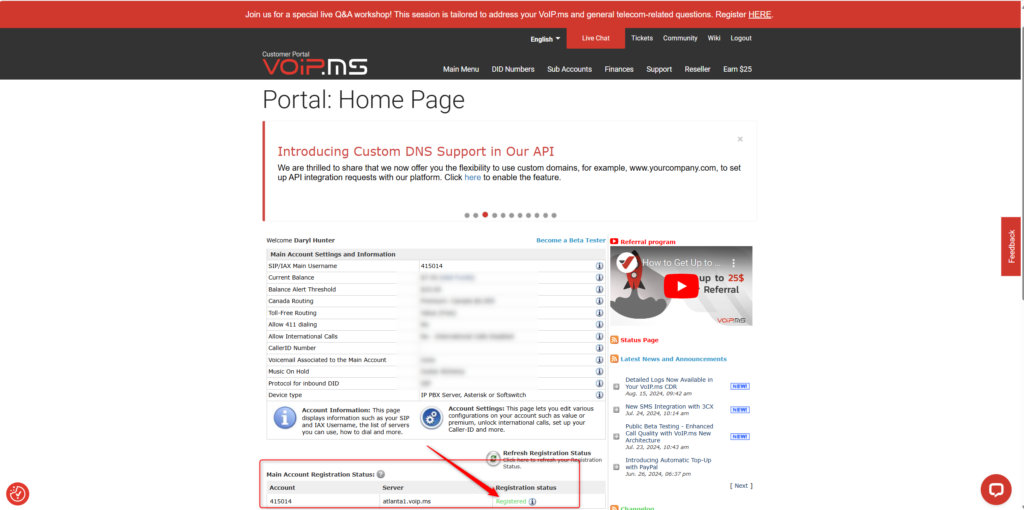
Sweet! I’m registered! Just to close the loop on this basic configuration, I want to dial one of my DIDs from voip.ms and see if that hits the SBC. I don’t expect anything to ring and I expect a busy signal as I haven’t done any Teams configuration yet, but, does this actually hit the SBC? Navigate to Monitor -> VOIP STATUS -> SBC CDR History and let’s look at the call history.
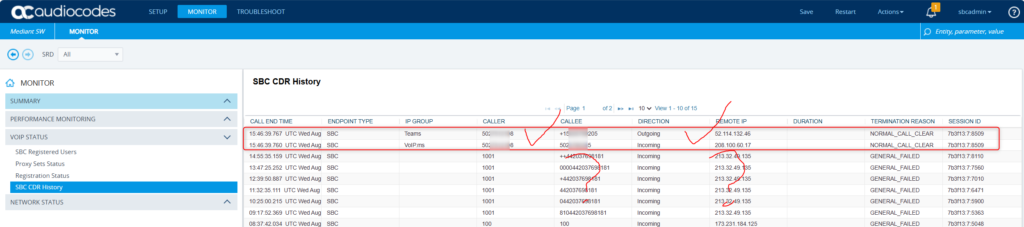
Wow! It actually works! Success! 🙂 The first two lines are my mobile calling my DID and the leg is attempted properly both from PSTN to voip.ms to SBC and also from SBC to Teams. I get a busy signal. Nothing really happens. But, the SIP Signaling properly works! I also see a bunch of trash in there and it looks like people are trying to place calls – maybe toll fraud. I’ll need to clean that up on my Azure NSG! Let’s move on to Teams!
Teams Direct Routing Configuration
Now that we feel comfortable with baseline SBC configuration, let’s work on the Teams environment. We want to make sure Teams knows how to properly – and securely – communicate with your SBC. To read the articles on how to setup this configuration, you should start here. Configure Direct Routing – Microsoft Teams | Microsoft Learn
Let’s start by setting up the SBC. I’ll use PowerShell for this and I’ll be mostly following the WIKI article provided above from voip.ms to make the changes.
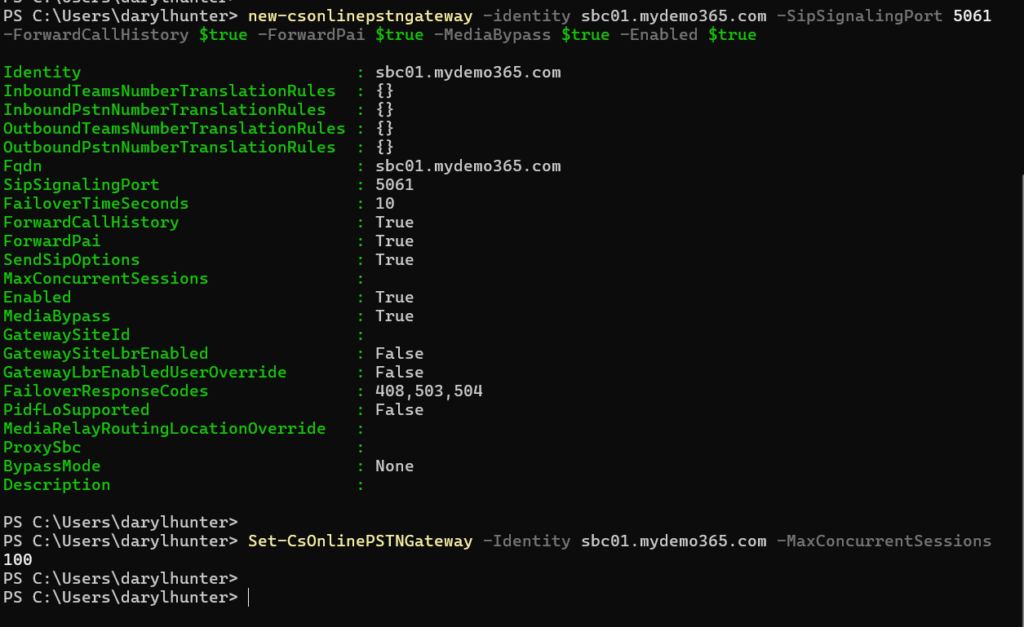
Online PSTN Gateway / SBC Configuration
We know the SBC name is sbc01.mydemo365.com and we’ll need to know which port we’re using 5061 (remember I called that out in the Wizard above!) and we set the SBC up for 100 concurrent sessions even though I know I’m running a trial / demo license which only allows for 3 🙂 Notice I did this in two steps because I forgot to add the max sessions at first. So, here’s the “new” and “set” commands
Online PSTN Usage Configuration
I’m keeping it simple. I’m adding a PSTN Usage called “DR” (for Direct Routing)

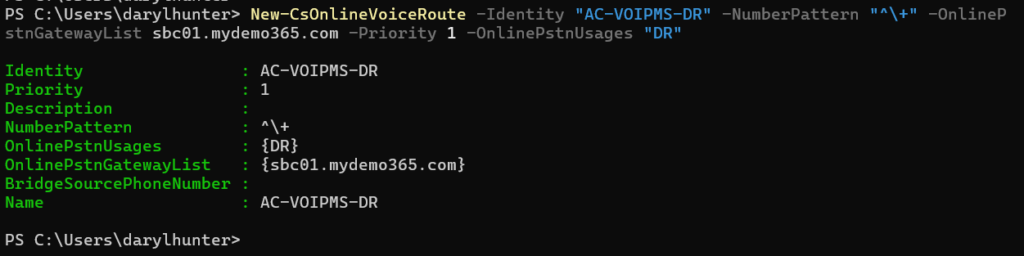
Online Voice Route Configuration
Again, keeping it simple. Adding a single Voice Route “AC-VOIPMS-DR” (Audiocodes / VoiP.ms / Direct Routing) that will route out any digits to the AudioCodes SBC
Online Voice Routing Policy Creation
Once again a simple policy that only uses the “DR” PSTN Usage created before. Notice the RouteType is BYOT – that’s “bring your own trunk” – or – Direct Routing

Enable User
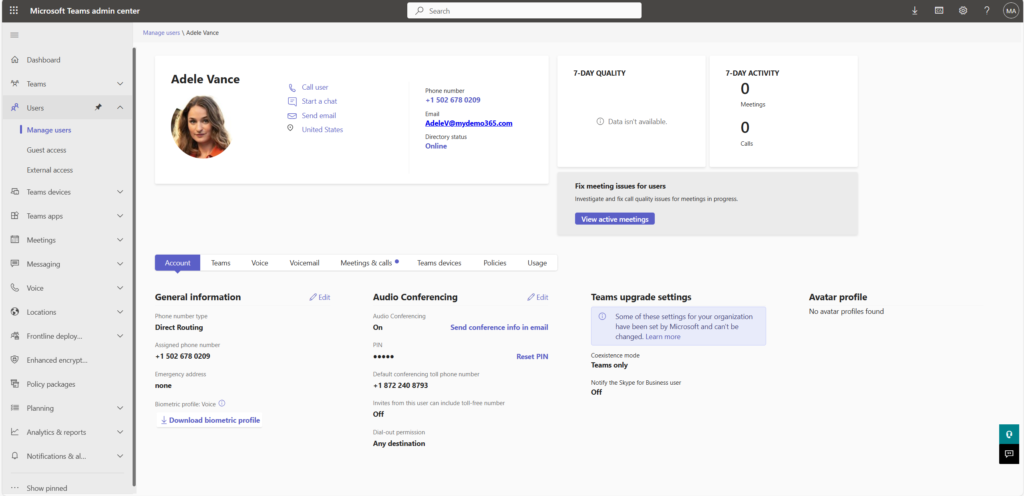
Let’s pick our victim – I mean – our M365 User. I’ll navigate to Microsoft 365 Admin and choose our friend Adele Vance. Adele has M365 E5 which includes Phone System. She has all the licensing she needs to be a Direct Routing Teams Phone enabled user. In my lab, I have the “unbundled E5” which mean I need to assign both the M365 E5 and also the standalone Microsoft Teams Enterprise licenses.

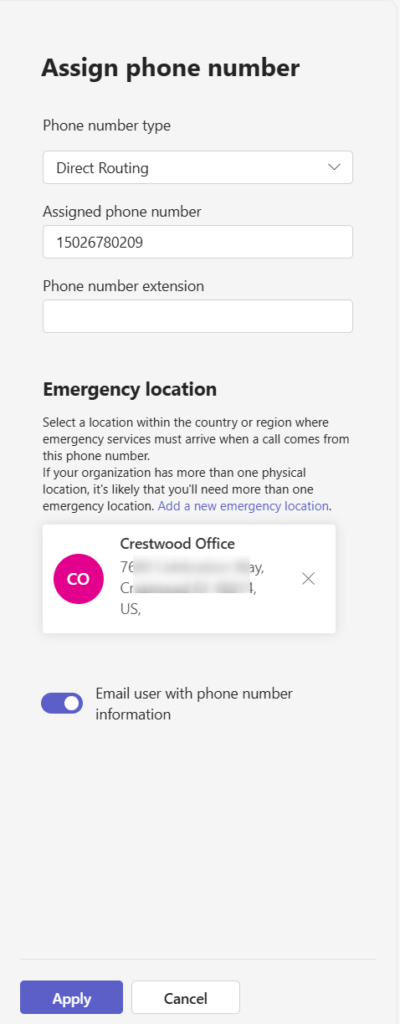
Let’s enable Adele for voice. I’ll pick one of my DIDs from voip.ms – I’ll go with +1-502-678-0209

I see I forgot to add an emergency location. I can do that either via a “set” command or just simply by adjusting the information in TAC. That’s what I’ll do.

Assign Voice Routing Policy
Let’s tie it all together and assign the policy we created to Adele

Sweet. What does Teams Admin Center think about what we’ve done? Let’s navigate to TAC -> Voice -> Direct Routing -> SBCs and look at our sbc01.mydemo365.com configuration
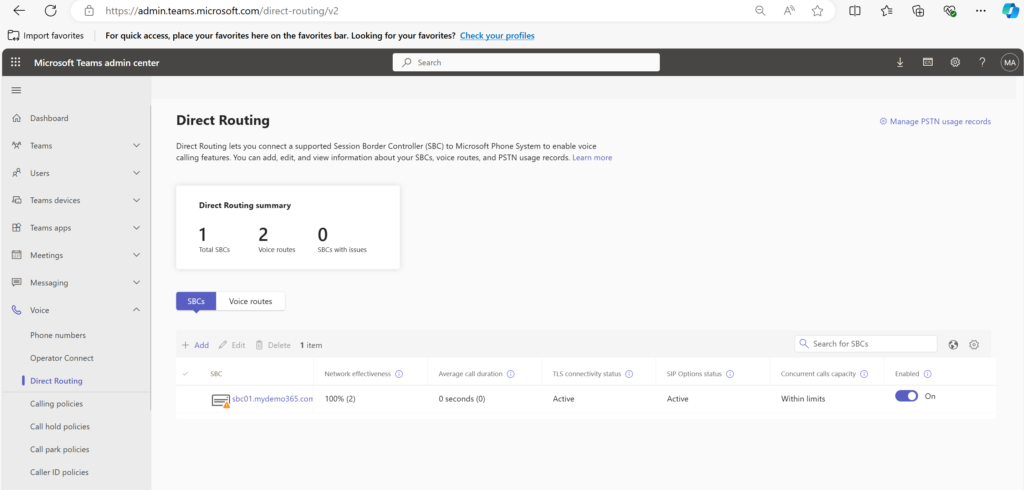
It looks okay visually. Let’s click on it and see more.
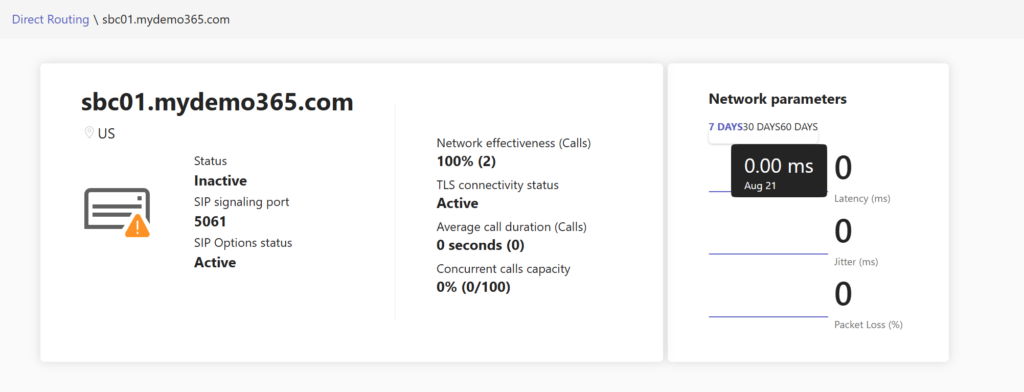
It says “Inactive” but the SIP Options and TLS Connectivity looks Active. This is pretty normal until you have the first few calls go through. It’s like an old guitar tube amp – it takes a few mins to warm up 🙂 Let’s repeat the same test we did earlier. Let’s call the DID setup for Adele and see what happens. I guess I should login a client as Adele first. Let me do that and make the test.
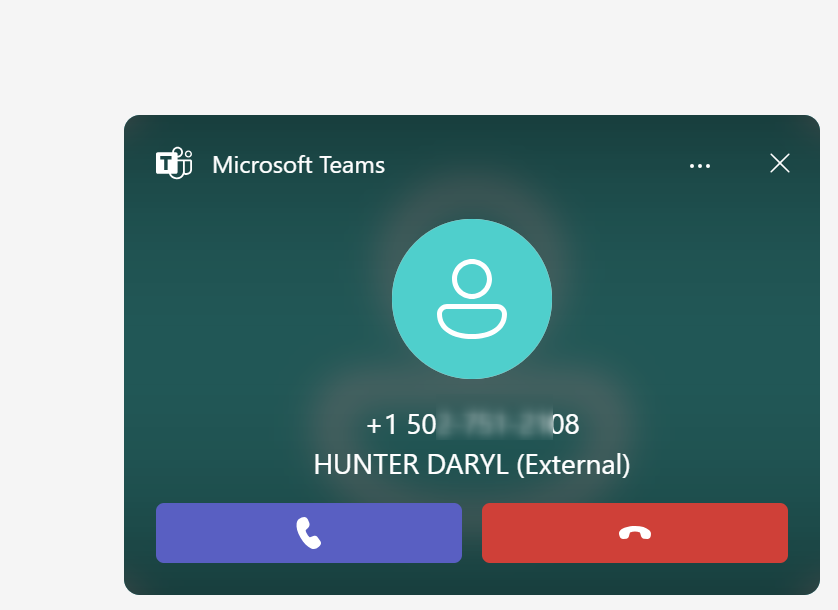
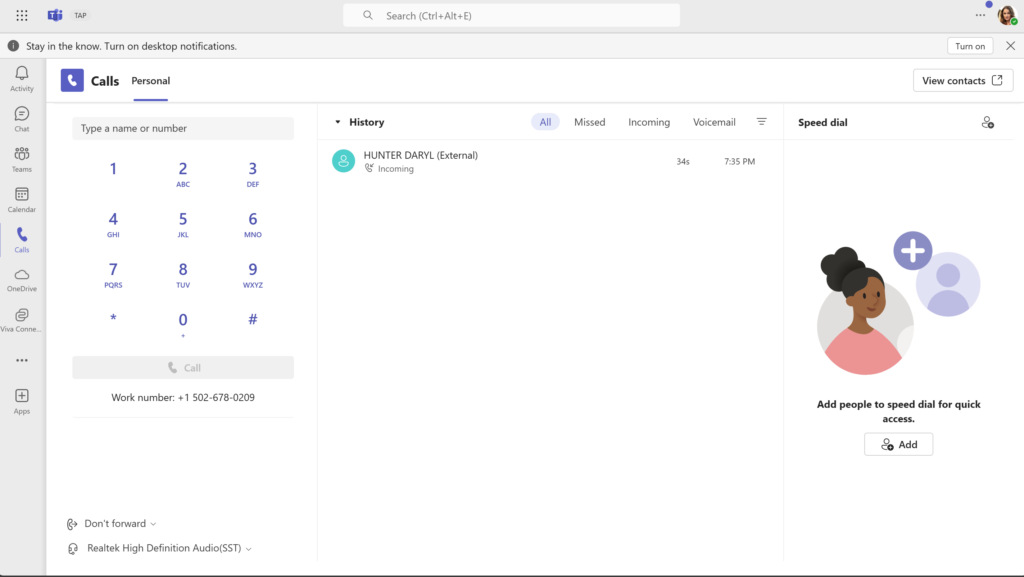
Sweet that’s cool! What about outbound? Let’s dial a number and see what happens.
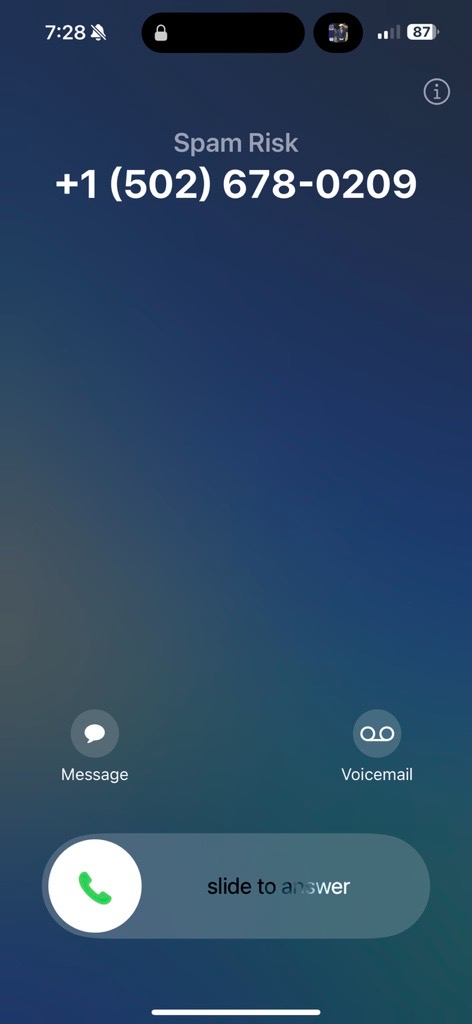
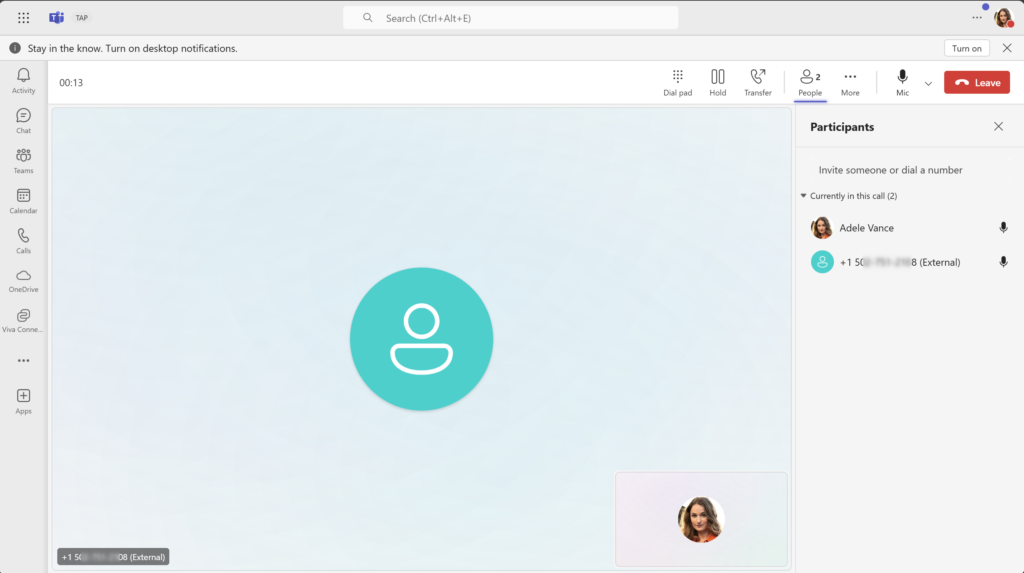
Sweet! I’ll answer that for a few seconds and hang up.
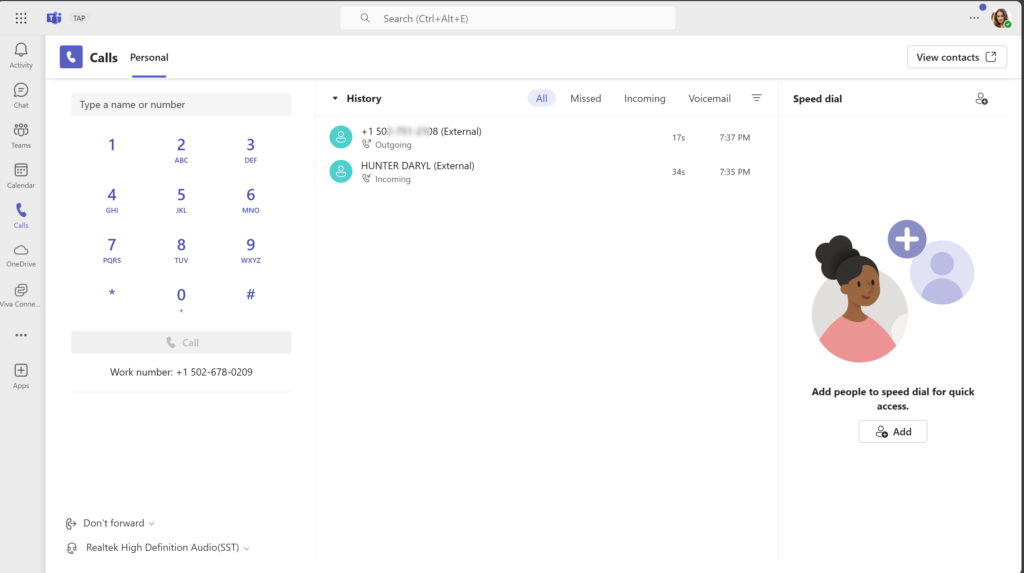
Sure enough! We have two-way calling! Let’s look at the AudioCodes SBC -> Monitor -> VOIP Status -> SBC CDR History and see what we see.

There they are!
Fini
I think that wraps this up! I just wanted to walk through a basic Teams Phone Direct Routing Lab. We now have a successfully deployed and configured an AudioCodes SBC via the Azure Marketplace. I brought my own telco from voip.ms (which was super simple!). We have successfully configured Microsoft Teams services & a user (Thanks Adele!) via Teams Admin Center & PowerShell. We have successfully tested two-way calling. Let’s call this done. For now… (ominous music here)
1 thought on “My Demo 365: Teams Phone Direct Routing – AudioCodes SBC Virtual Edition – Part 2”
Comments are closed.