Hi friends! Welcome back! My last post covered some of the common Teams device deployment accelerators. This has been a very popular post and timeline conversation for many of my colleagues at Microsoft.
Today I wanted to focus on Microsoft Teams Room for Windows. Your choice of MTR on Windows or Android depends on what you need. Here’s a handy comparison chart.
Today I wanted to cover a specific need that has come up several times recently: “how do I join an MTR on Windows to Azure AD – and delegate administration to a specific group of people?” That’s a great question. Let’s break it down a bit.
Pre-requisites
I’m going to make the assumption that you’ve already:
- Read my last post around account creation, licensing, device ownership, etc. I’m not going to rehash.
- Created an AAD Group for all of your MTR on Windows Resource Accounts
- Created an AAD Group for all of your MTR Devices themselves
- Created & Assigned an Intune Compliance Policy for the MTR Devices
- Configured & Assigned Conditional Access as needed
Let’s join Azure AD (AAD) & Intune
Okay, let’s start with joining my MTR to AAD & Intune. We’re literally going to follow the steps here. It’s pretty comprehensive and has great screen shots.
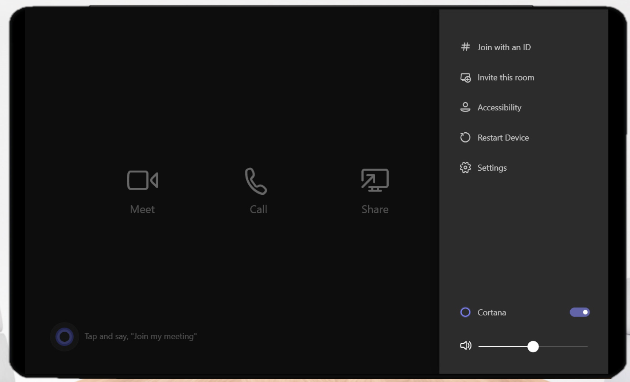
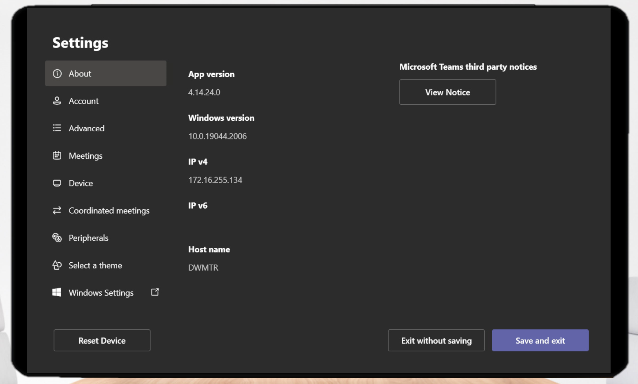
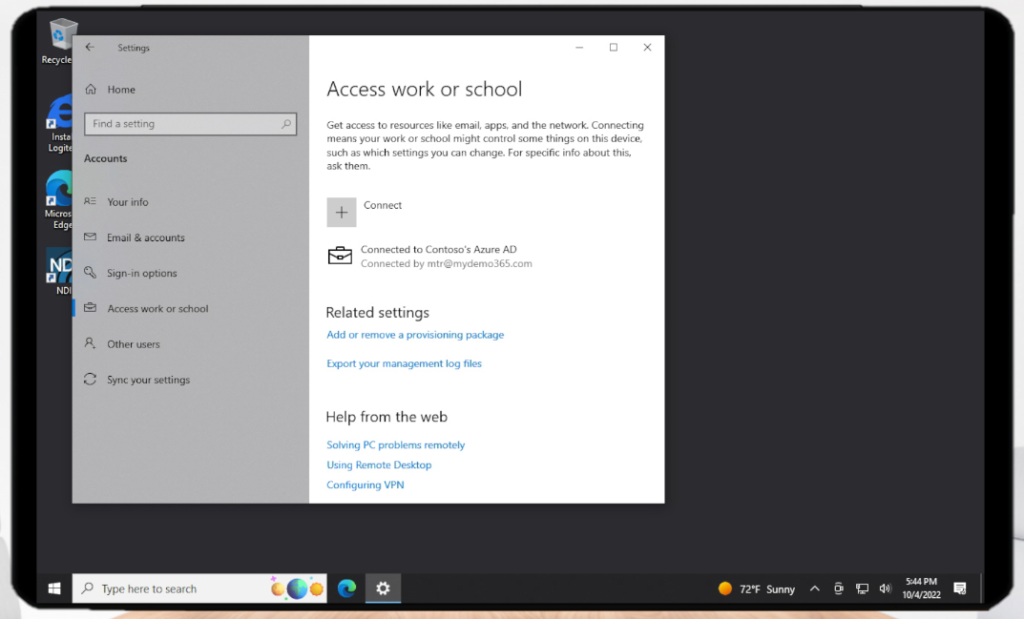
Login to your MTR -> Settings -> Windows Settings.
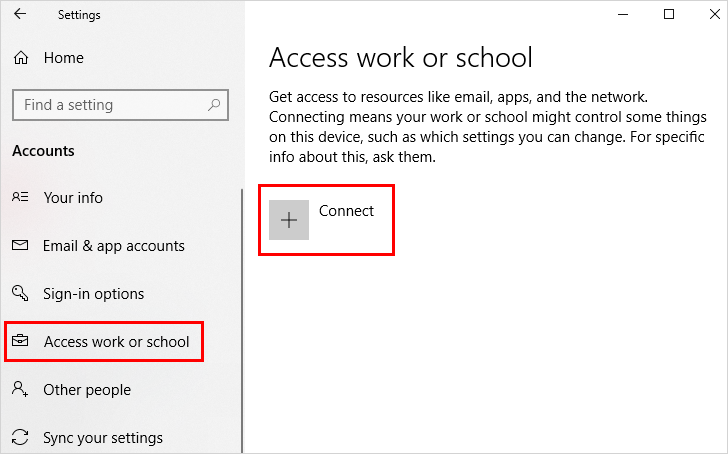
Now navigate to Windows 10 Settings > Accounts > Access Work or School and click Connect
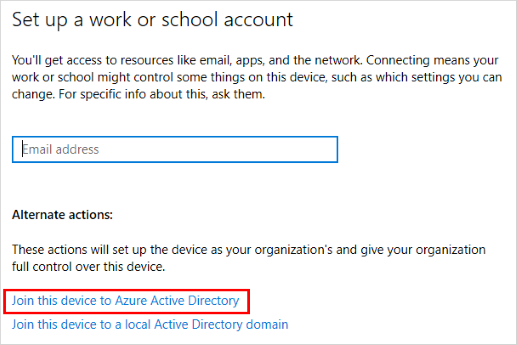
Now you’ll want to Join this device to Azure Active Director (AAD)
Follow the document and when you’re done it will look like this
*wait a few moments for Intune magic to work*

Okay, great. Now we have an AAD Joined MTR & all of the Intune Magic has enrolled, compliance applied, etc. Now let’s focus on the device management piece.
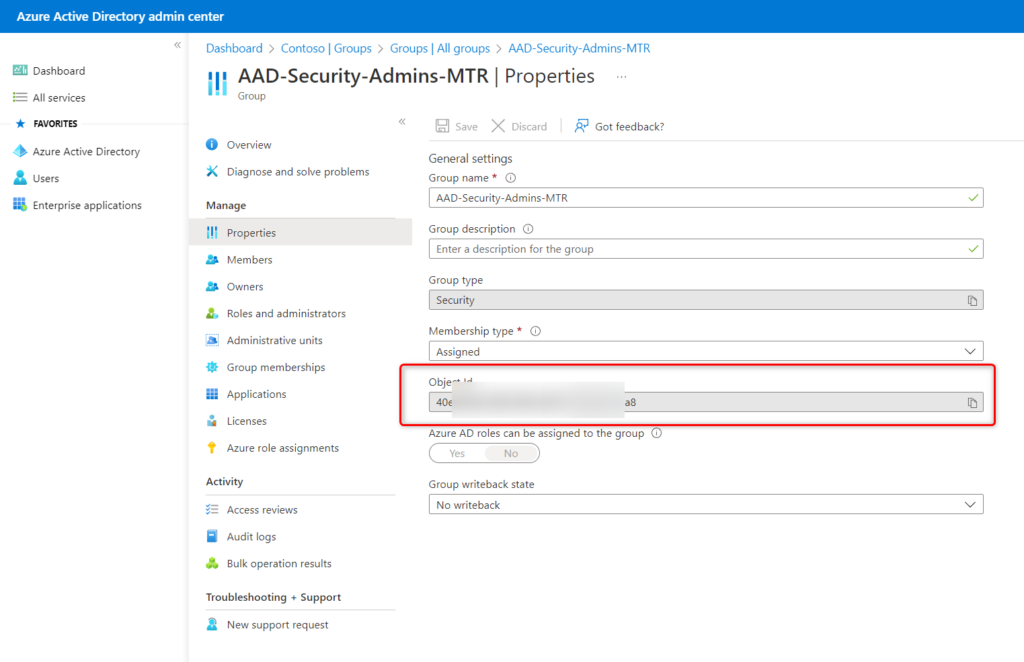
Create AAD Security Group for your MTR Admins
This part is pretty simple. Follow these directions to create a simple Azure AD Security Group and add the users you want to be your MTR Administrators. In my case, I created a group called AAD-Security-Admins-MTR and placed my two scoped admins in there.

Create & Apply an Intune CSP to deploy this new AAD group to all scoped MTR
This part is a little trickier. This guide will get you started. But, it doesn’t connect all the dots (or at least doesn’t connect all the dots enough for my brain).
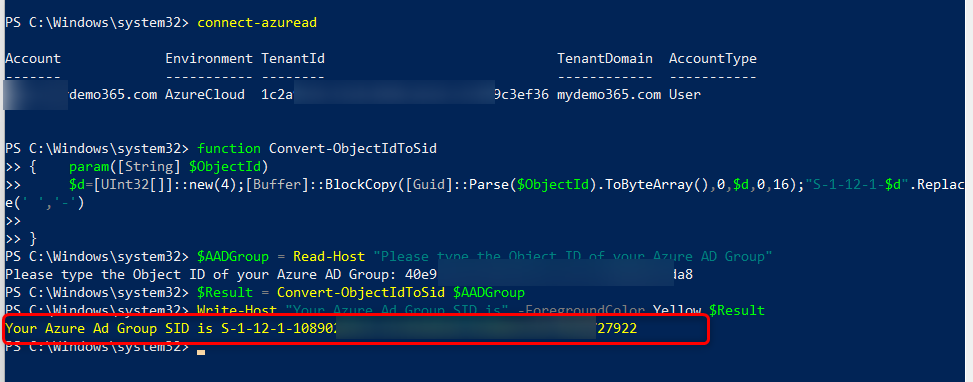
The first thing you need to do is get the SID of that AAD Security Group you just created. There are multiple ways to accomplish this via both PowerShell & Graph Explorer. I personally have found the PowerShell way to be a bit easier.
Start by connecting to Azure AD. I’m assuming you know how to install Azure PowerShell and “connect-azuread” yourself. If not, start here and catch up a bit 🙂
In Intune, select that AAD Security Group (see above) and copy the Object Id as shown below.
You’re going to want to use that in the following PowerShell snippet:
function Convert-ObjectIdToSid
{ param([String] $ObjectId)
$d=[UInt32[]]::new(4);[Buffer]::BlockCopy([Guid]::Parse($ObjectId).ToByteArray(),0,$d,0,16);”S-1-12-1-$d”.Replace(‘ ‘,’-‘)
}
$AADGroup = Read-Host “Please type the Object ID of your Azure AD Group”
$Result = Convert-ObjectIdToSid $AADGroup
Write-Host “Your Azure Ad Group SID is” -ForegroundColor Yellow $Result
This will prompt you for your Object ID. Copy/Paste and then it will spit-out your SID. You’ll want that for the next part.
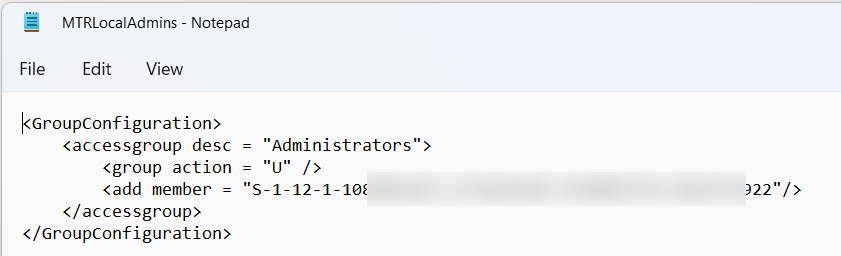
alrighty, stay with me. You now have your Azure AD Group SID. “S-1-12-1-foo” and we’re going to create an XML file. Go back to the link to create your Intune CSP – I’ll paste it here again – and we’ll want to create an XML file that will be used to properly change the local admins group of the MTR to include the AAD Group we just created.
Example 1 of that link is what we want. It looks like this.
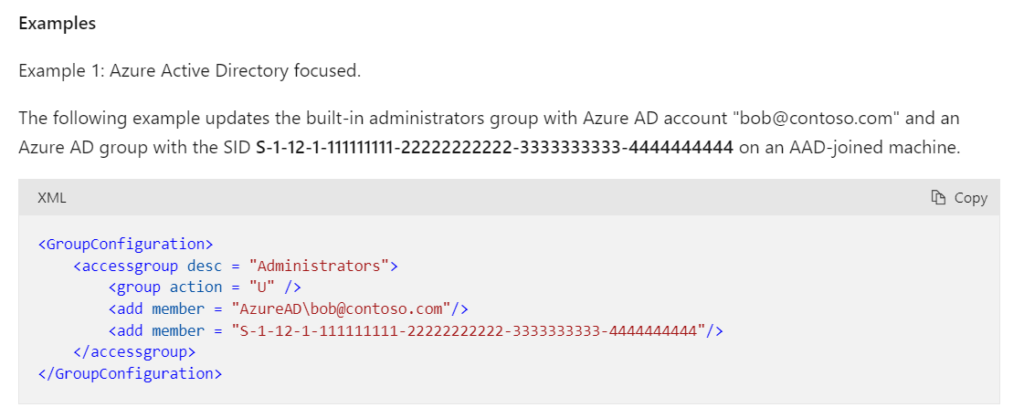
In my case, I’m gonna remove the “bob@contoso.com” entry and update the “S-1-12-1-foo” with the correct SID from above. So, my final XML look like this. Save this somewhere useful:
Great, now we have the XML file. Time to create the Intune CSP and put all the pieces together.
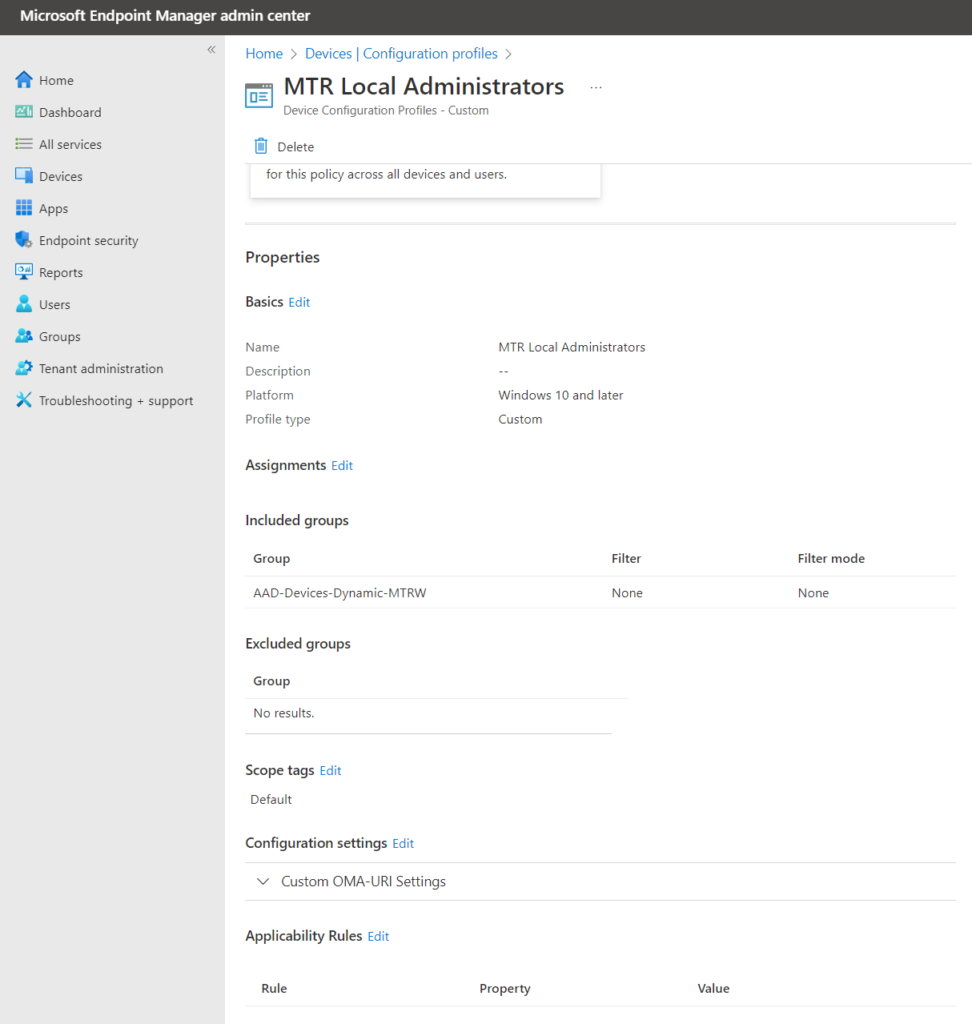
- In Intune / Endpoint Manager – select Devices -> Configuration profiles -> Create profile
- Under platform, select windows 10 and later.
- Under profile, select Templates -> Custom -> Create
- Add a name & description and click next
- Under configuration settings you’ll want to use OMA-URI and select add. Trust me. Keep going.
- In the Add Row pane, add a name and under OMA-URI, add the following string EXACTLY:
- ./Device/Vendor/MSFT/Policy/Config/LocalUsersAndGroups/Configure
- Under data type, select String XML and browse the XML file you created above.
If you’ve done all that correctly, it should look like this:

Excellent. Click save and then select/apply the groups you want to include. Save and apply. My final CSP looks like this:
*wait a few moments for Intune magic to work, device check-in to occur, and CSP to be applied*

Wrap it up already DW
Okay. All set. Now, what does this mean? This means we have an MTR device. It’s joined to AAD. We have an AAD group of administrators we want to delegate MTR Admin to. We’ve created a special Intune CSP (Configuration Profile) to do all of this. And it’s now applied.
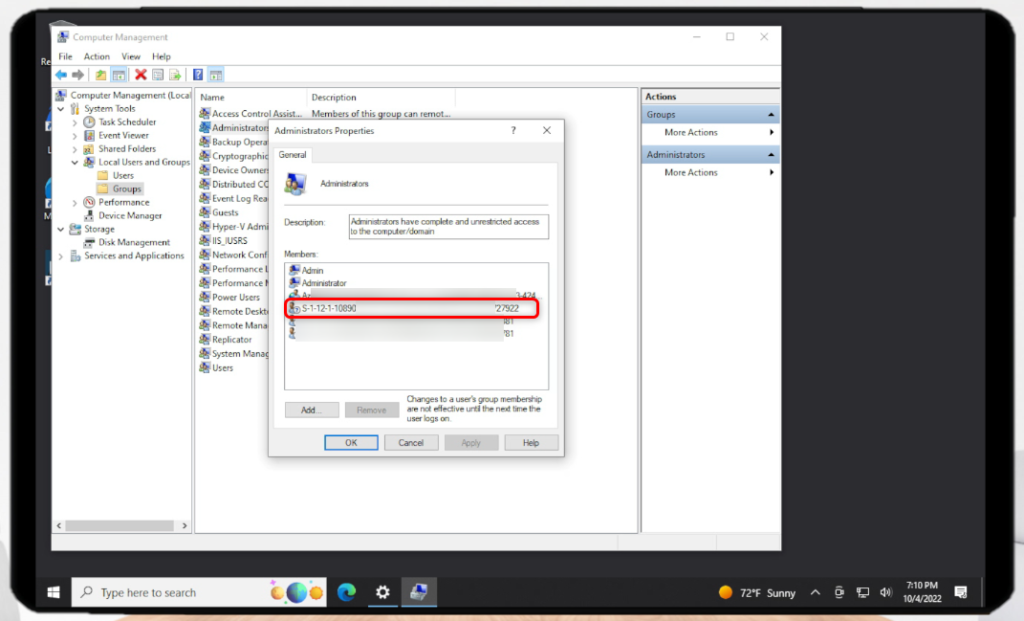
Let’s head back over to our MTR -> Settings -> Windows Settings and login using one of these delegated administrators. In this case, we’ll use of of these account founds in the AAD Group you’ve seen in these instructions above. I hope it works for you!
Great we’re in! We can validated the various SIDs by navigating to the Windows -> Computer Management -> Local Users & Groups -> Groups -> Administrators and view the SIDs that have this role.
Fini! I know that was super technical with lots of details and screen shots. I hope this gets you accelerated!