LifeChurch.tv uses the Websense Web Security Suite software for our content filtering on the Central network. We use this software to make sure that we are "safe" from any inappropriate material on the Internet. We also use it to make sure that people using our Public Wifi service have the same safeguards and also are not using the Internet for malicious uses.
For years, we used the IPCop software with various flavors of filtering centrally. We still use IPCop at most of our remote campuses, but will soon be migrating to Websense everywhere using our Cisco routers and remote Websense monitoring.
A couple months ago, I installed the Websense 6.3.2 Filter centrally into our ESX cluster and it worked great. It was filtering all material that I wanted and all was good. However, I did not install Logging/Reporting. A couple days ago, I was asked to produce a report, and couldn't… so… off to install Logging/Reporting. Oh yeah, by the way, I've upgraded to Websense 7.0 by now, so for those of you expecting to see Websense 6.x screens – sorry.
It's important to know about our environment. We're a VMWare ESX VI3 Virtual environment. We have 3 Dell 2950 ESX Hosts with 4 cores each, 32gigs of ram each, and with 10 NICs on 3 adapters – 2 Intel Pro 1000 (4 port) and the 2 onboard Broadcom each. 4 of our NICs are in a Portchannel – trunked for our various data vlans. These are spread among all 3 adapters for high availability. 3 of our NICs are in a Portchannel for iSCSI – again, spread around for high availability. 2 of our NICs are also in a Portchannel forthe VMKernel / VMotion. That leaves one NIC leftover. This one is on it's own isolated vSwitch and is setup on a SPAN Port on our Cisco Switches.
The first task was setting up the SPAN Port. In order to properly monitor + log all of our interesting traffic, we had to be able to see all the interesting traffic. Sounds simple enough, right? It is. I want to monitor all Internet traffic, so I want to "mirror" or "span" everything crossing the "inside" interface of my Cisco ASA firewall to the appropriate port on my ESX server.
- Let's assume that interface FA3/1 is my ASA Inside Interface
- Let's assume that interfaces FA3/2 is the interface connected to the ESX host that I care about
This really only requires two simple Cisco IOS commands
- routername(config)#monitor session 1 source interface fa3/1 tx
- routername(config)#monitor session 1 destination int fa3/2
That's it. You can then use "show int fa3/2" to see the trafic is actually hitting the interface.
The second task was setting up the vSwitch inside ESX.
If you aren't familiar, inside ESX you have the concept of "Virtual Networking" – you can create virtual switches, with little virtual port groups (like VLANs), and then you assign your VMs to those port groups. I know, it's hard to "get" unless you've seen it.
Anyway, I created a vSwitch, called vSwitch 3, using my viClient.
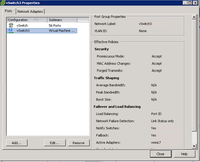
You can see the VM, WEBFILTER01, already attached. You can also see vmNIC 7 is the physical network card assigned to this virtual switch. This is the card that we are mirroring traffic to above.
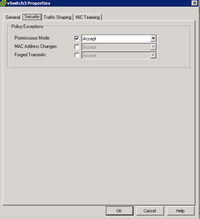
Anyway, the step I missed on this was actually configuring the Port Group properly so it could see all of the traffic coming to it. Click on Properties so you can edit the settings of your vSwitch.
Choose the Virtual Machine Port Group and click Edit. You are going
to want to edit some specific settings here related to Security
So, once your properties open up, click on the Security tab. You'll
want to tick the box next to "Promiscuous Mode" and change the
drop-down combo box to say "Accept." I missed this step the first
time. By using Wireshark, I was able to watch the traffic and verify it worked after I made these important settings.
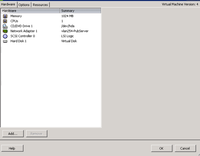
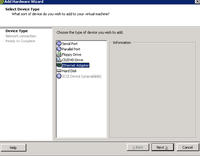
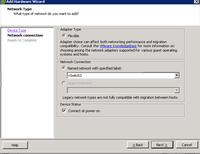
The third task was to install and configure a second vNIC on the Websense Box. This is relatively easy. It requires shutting down the Virtual Machine though. Once shut down, right-click on the VM and choose Edit Settings.
Here are few screenshots… in order… Click Next…Next…Next… on to Finish
You'll notice that I added this vNIC to vSwitch3 that was created above.
Great, now that you have the vNIC added, boot your VM.
Login and Windows will
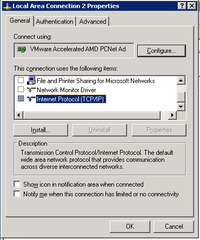
install the drive and add your secondary Local Area Connection. You'll want to right-click on it and bring up the properties.
You'll want to uninstall / unbind TCP/IP. Yes, you don't need an IP
address, and if you have an IP even checked, it could cause some issues
according to the Websense documentation.
The fourth task was to install the database tool. Previously I have used MSDE 2000 SP4. For this particualr install, I wanted to use SQL Express 2005. Everything installed great, but logging didn't work. After several days of beating my head agaist the wall, I realized it was because MSFT removed the SQL Agent from the SQL Express products. MSDE has SQL Agent. Full SQL Server has the SQL Agent. The new / free / "msde replacment" SQL Express products are crippled. So, they won't work. Bummer. So, I installed SQL 2005 using mixed mode authentication and a strong "sa" password. I won't go into SQL Installs here. It's very simple.
The fifth task was to install the Websense Network Agent and Reporting featuresets – and configure this to monitor traffic on the secondary vNIC – the one discussed above without TCP/IP binding. Unfortunately, I've already done this, so I don't have screen shots to go back to for you. However, it was really simple. Just start the setup.exe program, choose to install the Network Agent, and click "Next" a whole bunch of times. During the install, it will ask you which NIC to monitor – and you will choose the seconday vNIC without TCP/IP binding. It really was that simple – sorry for no visuals.
The sixth and final task was to configure Websense to "monitor" via the second vNIC (no IP Address) and to "block" via the primary vNIC (with IP Address).
Log onto the Websense Manager tool. With version 7, this is now a web GUI.
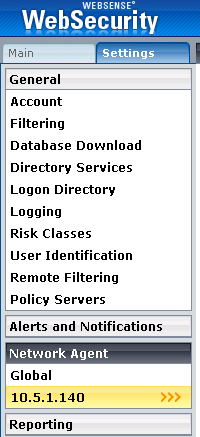
Choose Settings. Then click on the Network Agent link. Then click on
the IP Address of your Websense server – 10.5.1.140 is mine. You can see what that looks like below.
On the right-hand window pane, you'll have the ability to scroll down
and see NIC-1 has an IP address and NIC-2 does not. That's the correct
outcome of the 4th and 5th task above.
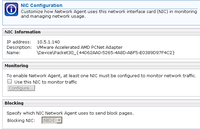
Click on NIC-1 to verify the settings… they should look like the
image below. If you click on the thumbnail you'll notice that
NIC1 does not monitor – it only blocks. This is correct.
Now, click on NIC-2 to verify those settings… they should look like
the image below. If you click the thumbnail you'll notice that
NIC2 does the monitoring, and it set to let the blocks go out NIC-1.
This is correct.
That's it. Hooray! You did it. Websense is now logging and you can
report against all of your interesting web traffic. Just for fun, below a snapshot of our web traffic today – 11/07/2008. Happy Filtering!



Hi Daryl,
I saw one of your tweets on twitter and found this blog posting. I work for Websense and I just wanted to say thanks for writing about us! I would love to hear your feedback about the new version 7, or about your experience with Websense overall. Please feel free to email me.
Sarah Needham
Hi Daryl,
I just wanted to say Thank you for this article, i was trying to find out about this issue for some months now and i believe you gave me the answer.
We are working with Websense V7 end ESX 3.5, and the virtualized Websense was a problem for us.
Regards,
Nicolas De waegeneire
Aren’t you now unable to Vmotion the VM in question since the SPAN is only setup on the one ESX host? Were you to move the VM to an ESX host without the SPAN you’d no longer be able to see your interesting traffic. Am I missing something?
Eric–
I wasn’t verbose in this post. I set the SPAN for all my ESX hosts. I have four now. It looks like this on my 6509 (my new core switch):
monitor session 1 source interface gig8/46 tx
monitor session 1 destination interface gig9/37 – 40
interface gig8/46 is my Inside ASA interface
interface gig9/37 – 40 are the interfaces setup in ESX to handle the SPAN
you aren’t missing anything – if I had only set this up on one/single ESX host, you’re right, I wouldn’t be able to vmotion it properly.
Good catch – bad documentation 🙂
–DW
Hey Daryl,
Great writeup! I wish I had come across this prior to hours spent on the phone with Websense support. 🙂
We actually have our’s setup exactly how you described but still seem to be having issues. We already had the port span in place because we used it for our old SurfControl environment. So we simply assigned the vSwitch to a physical NIC on our host system and plugged that phycical NIC into the port span.
I have verified that Promiscous mode is enabled, etc.
I do have one question about unbinding TCP/IP from the monitoring NIC. Did you do this prior to installing Websense? I tried that option but then when I get to the part in the installation page where it asks which NIC I would like to use to monitor traffic there is only one card listed and it is the card I plan to use for Blocking.
It seems that the NIC needs an IP address, at least to get through the installation.
We are running on Windows Server 2008, 32 bit. Websense version is 7.1. Any additional tips or suggestions would be greatly appreciated.
Thanks!
Hey Jeff–
I created the second NIC – and unbound it from TCP/IP etc. before I installed Websense. It did not have an IP during installation, etc. My Websense box is Server 2003 R2. At the time of installation, Server 2008 wasn’t a supported configuration. Have you verified that you don’t have the NIC disabled on either a) ESX or b) your Windows OS? If there are any screenshots you’d like to see from my install just ping me on email – daryl at lifechurch dot tv – and I’ll send them your way.
–DW
I am seeing the same thing a Jeff. We are running Websense v 7.1 stand alone on a Server 2008 32-bit box, ESX 4. After I unbind the IP the NIC is no longer seen by websense.
Any additional tips or suggestions would be greatly appreciated.
I have the same problem. Seems to be an OS issue when you unbind the TCP/IP stack from the nic Server 2008 seems to just block the nic altogether.